Redirecting Requests to a Country-Specific URL using AWS CloudFront and Lambda@edge
in Development on DevOps
AWS CloudFront와 Lambda@edge를 이용해서 사용자의 요청을 자동으로 국가별로 redirect해주는 기능을 구현하였다. 이런 작업을 처리하는 방법은 여러 가지가 가능하겠지만, AWS를 이용한 방법이 가장 효과적일거라 판단을 했다. 원리는 간단하다.
- CloudFront는 CDN 서비스이다.
- CND은 요청자의 접속 지역을 알 수 있어야 한다.
- CloudFront는 해당 정보를 Header에 넣어 줄 수 있다.
- Lambda@edge는 CloudFront 요청을 trigger로 설정하여 바로 동작이 가능하다.
- Lambda@edge에서 CloudFront의 Header정보를 보고 바로 응답을 보내주면 해결된다.
1. S3에 static website 배포
CloudFront는 AWS 내의 resource를 target으로 가져야한다. 모든 요청들을 다 다른 곳으로 redirect하더라도 아무것도 없는 빈 website라도 하나 만들어야 CloudFront를 띄울 수가 있다. 만약 이미 운영중인 static website가 있다면 이번 단계를 건너뛰고 바로 다음 단계로 넘어가면 된다. 이번 단계는 상세한 설명없이 바로 Terraform코드로 대체하겠다.
1.1 S3 static website + Route53 Record 배포
먼저 SSL인증서 없이 http로 접속이 되는 S3 static website를 배포해 보겠다.
variable 중 domain_name는 example.com이라고 가정하겠다.
resource "aws_s3_bucket" "blank" {
  bucket = "blank.${var.domain_name}"
  acl    = "public-read"

  website {
    index_document = "index.html"
    error_document = "index.html"
  }
}

data "aws_route53_zone" "selected" {
  name = var.domain_name
}

resource "aws_route53_record" "blank" {
  zone_id = data.aws_route53_zone.selected.zone_id
  name    = "blank"
  type    = "A"

  alias {
    name                   = "s3-website-ap-northeast-1.amazonaws.com"
    zone_id                = var.s3_website_endpoint_route53_hosted_zone_id
    evaluate_target_health = false
  }
}
s3_website_endpoint_route53_hosted_zone_id 값은 아래 링크에서 각 지역별로 알 수 있다.
- index.html
blank
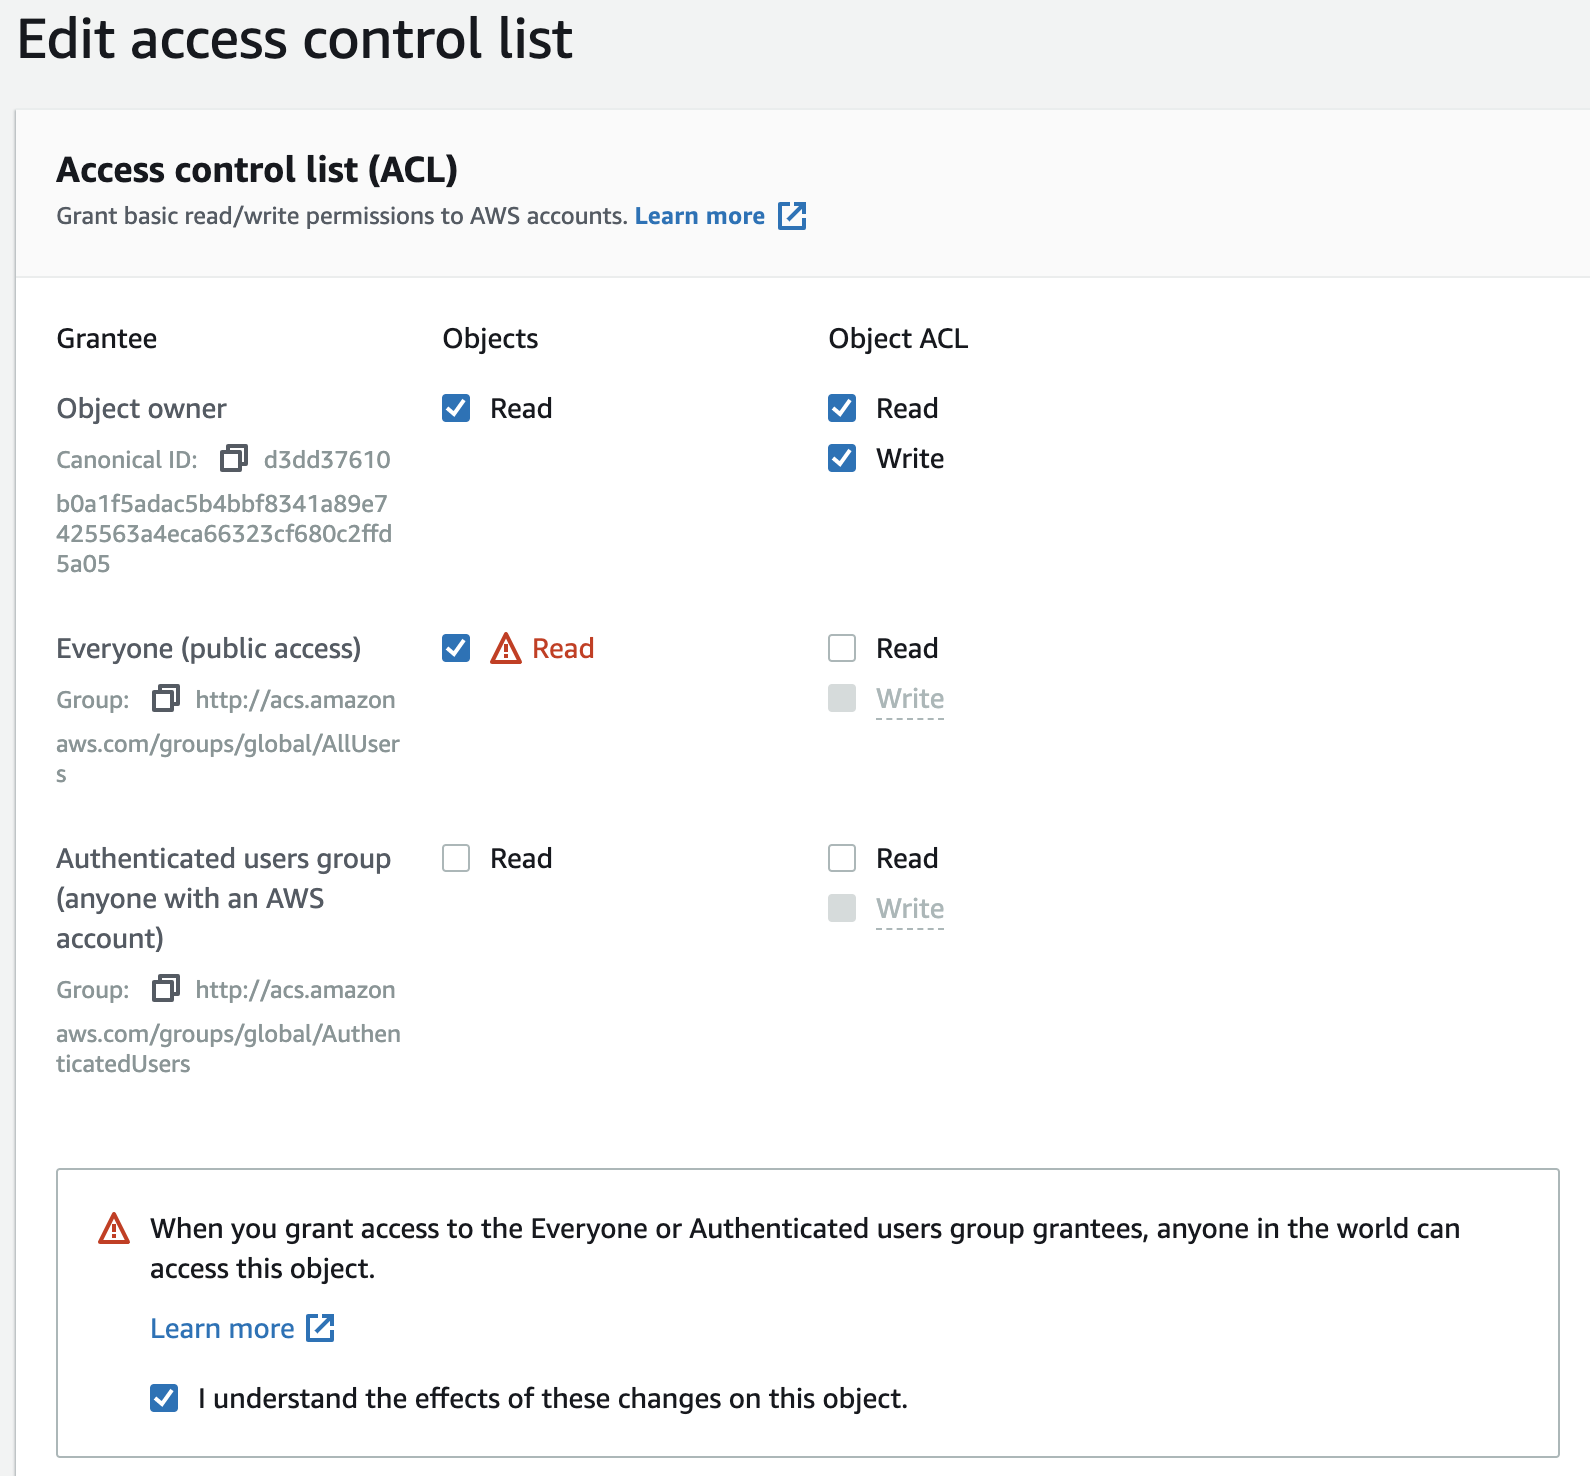
index.html은 그냥 blank라는 문자열 하나만 넣었다. 이것을 S3에 업로드한다. 파일 업로드만 한 뒤 접속을 시도하면 403 Forbidden 오류가 발생할 것이다. 왜냐면 해당 파일에 대한 read 권한이 없기 때문이다. public으로 read권한을 줘야 한다.
S3에 upload 후 해당 파일에서 Permissions -> Edit를 누른다.
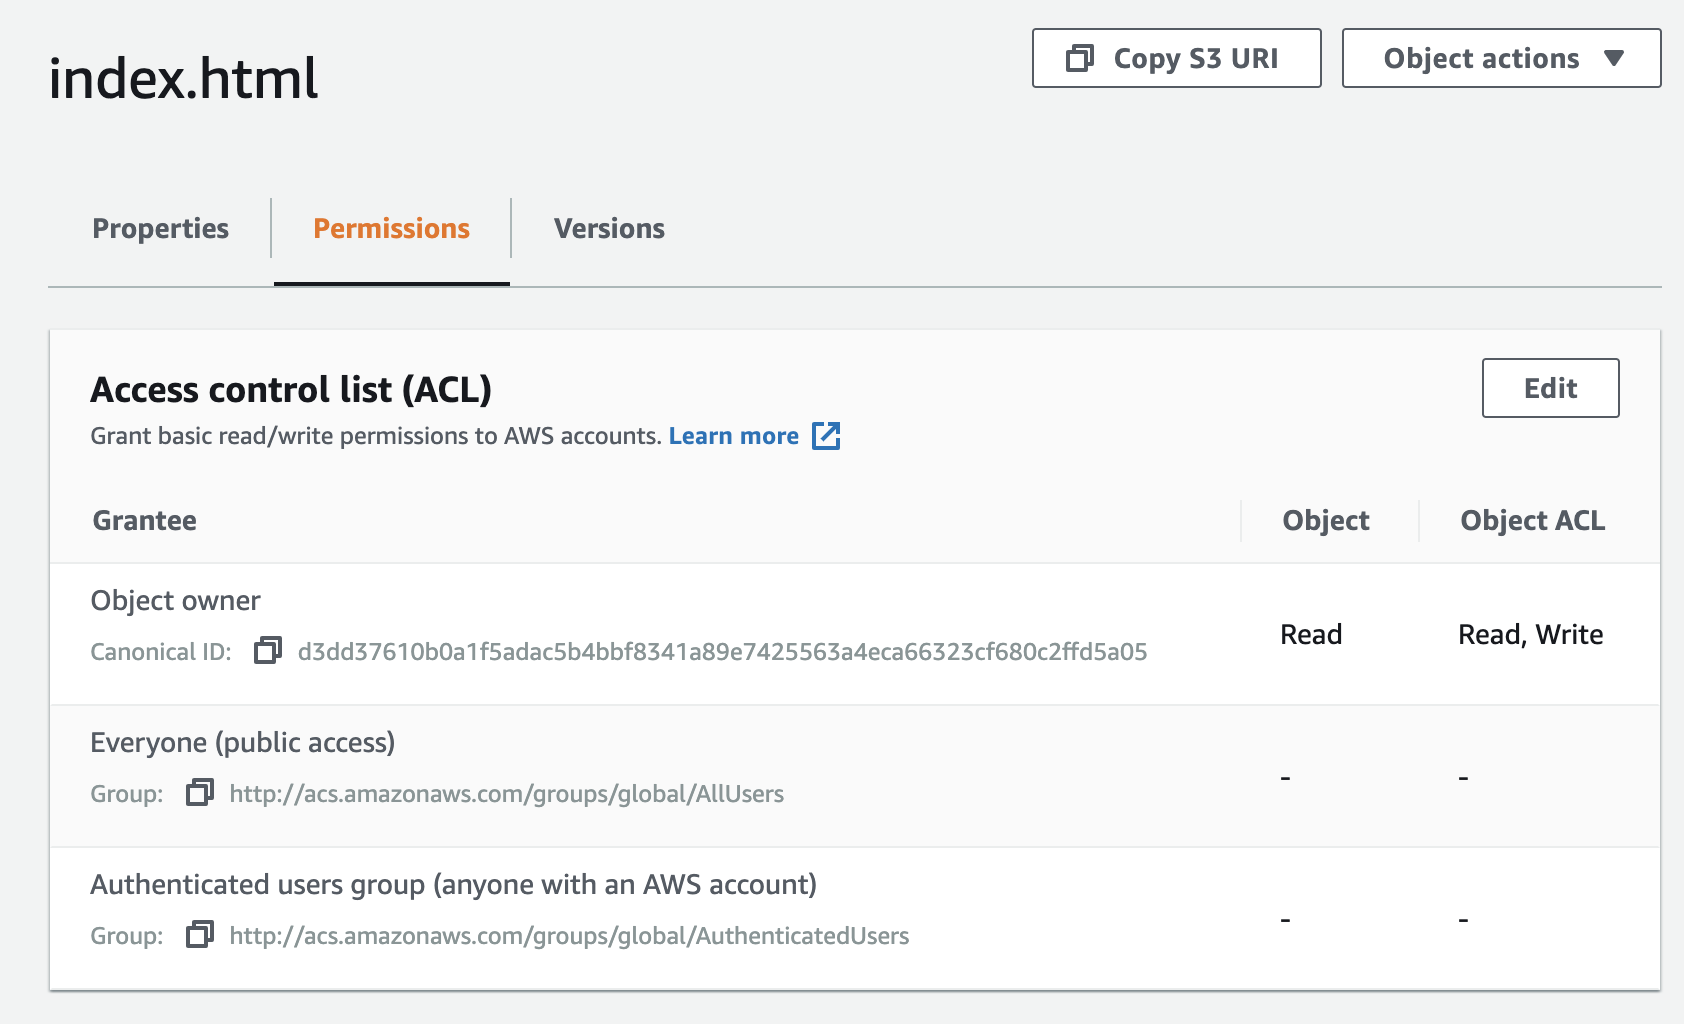
그런 다음 Everyone (public access)를 Read 체크한 뒤 아래 경고문까지 체크한다. 그런 뒤 가장 아래 Save changes를 눌러서 적용을 하면 이제부터 정상적으로 static website가 동작한다.
1.2 CloudFront에 ACM의 SSL 인증서를 연결하여 https 가능하도록 설정
ACM을 이용하여 SSL 인증서 처리를 같이 해주면서 CloudFront를 앞에 붙인다. Route53에서는 이제 S3가 아닌 CloudFront를 가르켜야 한다. ACM은 이미 발급받았다고 가정하겠다.
CloudFront를 추가해주자.
resource "aws_cloudfront_distribution" "blank" {
  origin {
    domain_name = aws_s3_bucket.blank.website_endpoint
    origin_id   = "S3-blank.${var.domain_name}"

    custom_origin_config {
      http_port              = 80
      https_port             = 443
      origin_protocol_policy = "http-only"
      origin_ssl_protocols   = ["TLSv1", "TLSv1.1", "TLSv1.2"]
    }
  }

  aliases = ["blank.${var.domain_name}"]

  enabled             = true
  is_ipv6_enabled     = false
  default_root_object = "index.html"

  default_cache_behavior {
    allowed_methods  = ["GET", "HEAD", "OPTIONS"]
    cached_methods   = ["GET", "HEAD"]
    target_origin_id = "S3-blank.${var.domain_name}"
    compress         = true

    forwarded_values {
      query_string = true

      cookies {
        forward = "none"
      }
    }

    viewer_protocol_policy = "redirect-to-https"
    min_ttl                = 0
    default_ttl            = 0
    max_ttl                = 0
  }

  price_class = "PriceClass_200"

  restrictions {
    geo_restriction {
      restriction_type = "none"
    }
  }

  viewer_certificate {
    acm_certificate_arn = var.virginia_acm_arn
    ssl_support_method  = "sni-only"
  }
}
앞에서 선언했던 Route53 Record를 수정한다.
resource "aws_route53_record" "blank" {
  zone_id = data.aws_route53_zone.selected.zone_id
  name    = "blank"
  type    = "CNAME"
  ttl     = 5
  records = [aws_cloudfront_distribution.blank.domain_name]
}
이제부터 https://blank.example.com 으로 접속이 가능하다.
2. CloudFront에 접속국가를 Header에 추가
CloudFront Console로 가서 CloudFront Distributions에서 방금 배포된 resource를 선택한 후 Behaviors -> Default(*) 선택 -> Edit를 누른다.
Cache and origin request settings 항목에서 Use a cache policy and origin request policy를 선택하면 아래에 새로운 항목들이 생긴다. 거기서 Origin Request Policy 에 Create a new policy를 선택 선택해서 새로운 Policy를 만든다. 만약 기존에 이미 CloudFront-Viewer-Country 정보를 포함하는 Policy를 만들었다면 그걸 선택해도 된다.
Header에 CloudFront-Viewer-Country 정보를 포함시켜야 한다.
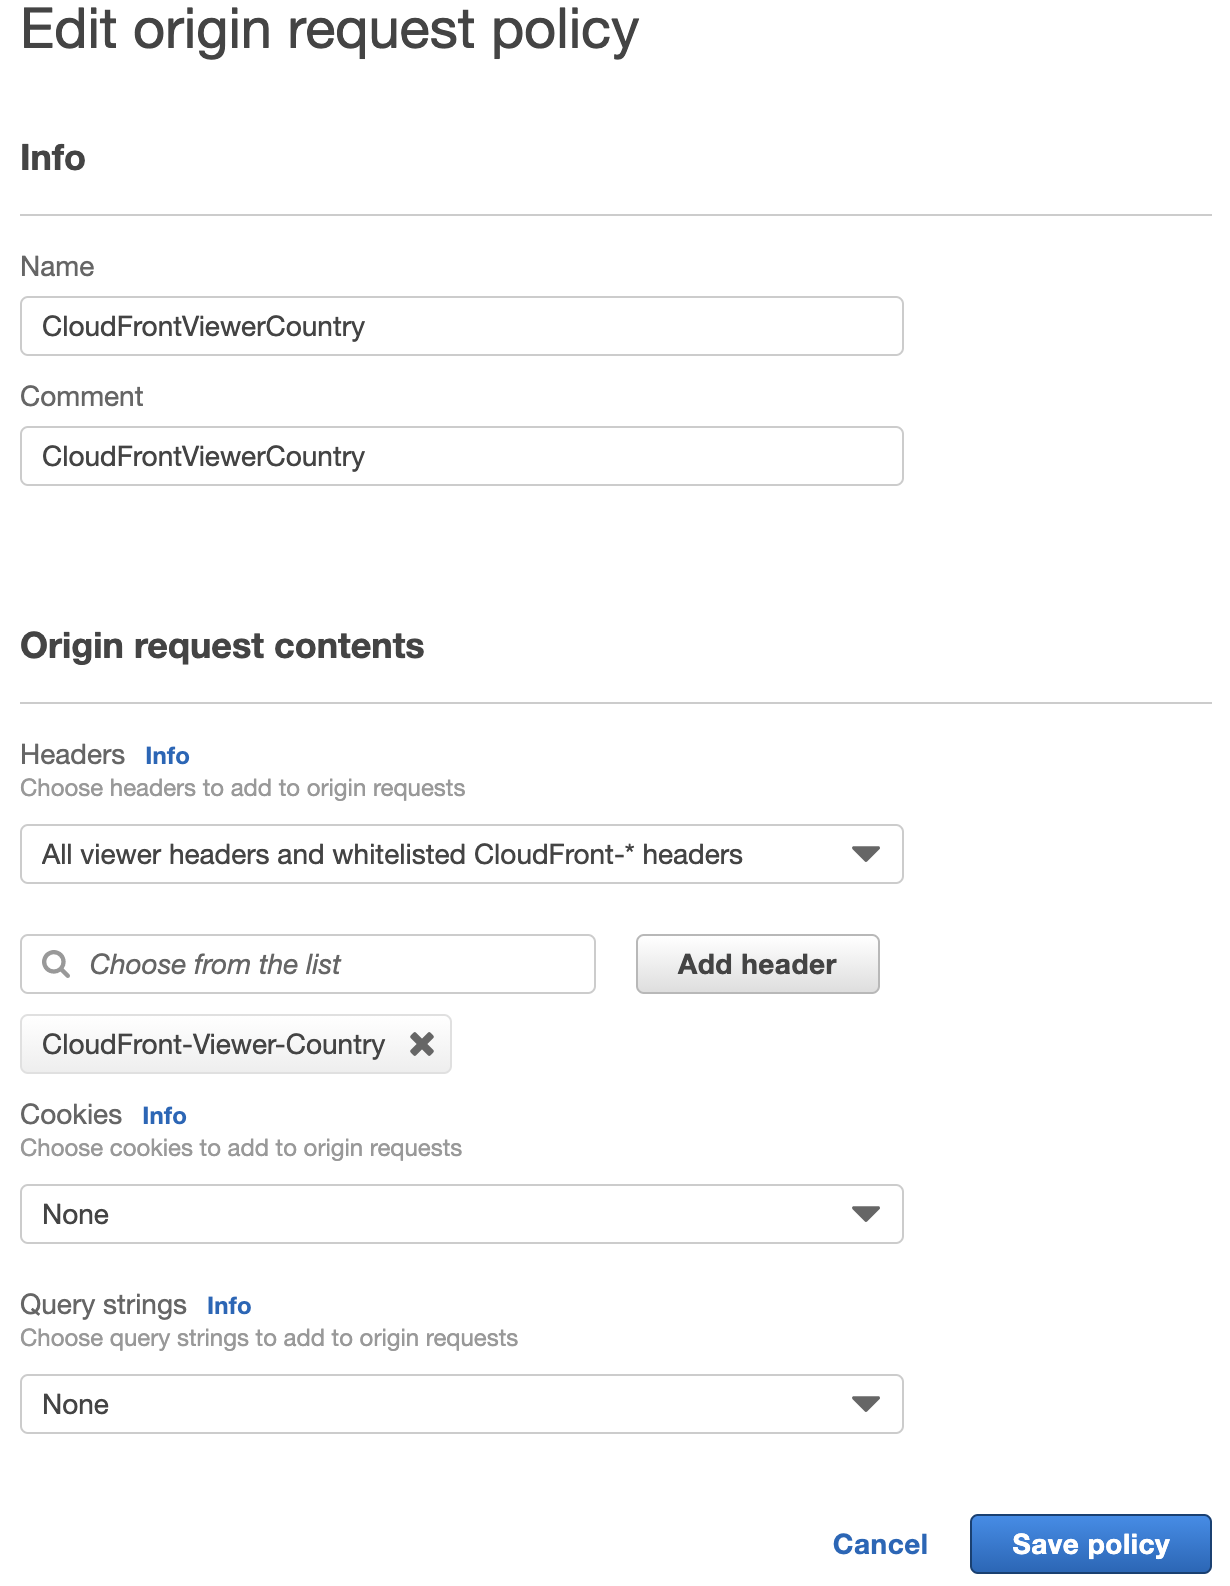
Origin request contents 에서 Headers를 All viewer headers and whitelisted CloudFront-* headers 를 선택하고 바로 아래에 CloudFront-Viewer-Country를 추가한다. 그렇게 생성한 Origin Request Policy를 적용한다.
Using the CloudFront HTTP headers 에서 Headers for determining the viewer’s location 세션을 보면 관련 정보를 확인 할 수 있다.
3. Lambda@Edge 생성
Lambda@Edge를 생성하려면 Lambda를 US East (N. Virginia) us-east-1에 생성을 한 뒤 CloudFront와 연결하면 된다.
Create function에서 Use a blueprint를 선택한 다음 cloudfront라고 검색하면 몇가지가 뜨는데 그중 아무거나 선택한다.
원하는 Function name을 입력하고 Execution role을 새로 만들거나 기존의 role을 선택한다. Create Function을 누르면 Deploy to Lambda&Edge 화면이 나온다. Distribution 에 위에서 생성한 CloudFront를 선택하고 Include Body 아래 경고문을 체크한 후 Deploy를 누른다.
그러면 그림과 같이 versioning이 된다.

수정은 $latest인 상태에서만 가능하다. 그러므로 위에 Lambda명을 눌러서 이동을 해서 수정모드로 들어간 다음에 코드를 수정한다.
https://docs.aws.amazon.com/AmazonCloudFront/latest/DeveloperGuide/lambda-examples.html#lambda-examples-redirecting-examples 해당 링크의 공식 예제를 참고하였다.
'use strict';

/* This is an origin request function */
exports.handler = async (event, context) => {
    const request = event.Records[0].cf.request;
    const headers = request.headers;

    let url = null;
    if (headers['cloudfront-viewer-country']) {
        const countryCode = headers['cloudfront-viewer-country'][0].value;
        if (countryCode === 'KR') {
            url = 'https://kr.example.com/';
        } else if (countryCode === 'US') {
            url = 'https://us.example.com/';
        } else {
          return request
        }
    }

    const response = {
          status: '302',
          statusDescription: 'Found',
          headers: {
              location: [{
                  key: 'Location',
                  value: url,
              }],
          },
      }

    return response
};
국가코드는 https://en.wikipedia.org/wiki/ISO_3166-1_alpha-2 에서 확인이 가능하다.
코드에 대해서 간단히 설명하면 우리가 설정한 국가가 아닐때는 원래 설정한 S3 static website로 이동시키고, 우리가 설정한 국가에서는 예제코드에 있는 url로 redirect시킨다. 만약 S3로 갈 필요가 없이 모두 redirect하고자 한다면 let url = 부분에 default url을 입력해두고 return request를 빼면 된다.
수정 후 Depoly를 누른다. 코드를 수정하면 다시 배포를 해야한다. Configuration에서 + Add trigger를 누른 뒤, CloudFront를 선택하고 Deaploy to Lambda@Edge를 누른 뒤 Use existing CloudFront trigger on this function를 선택하고 Deploy를 누른다. 그러면 버전의 숫자가 올라간 상태로 배포가 된다.
다시 접속을 하면 브라우저의 주소창이 https://kr.example.com/ 이렇게 바뀌어 있는것이 확인 가능하다.
이 글이 도움이 되셨다면 공감 및 광고 클릭을 부탁드립니다 :)