Jupyter notebook markdown에 내가 원하는 css 적용하기
in Computer on Jupyter Notebook
요즘 파이썬을 공부하는데 Jupyter notebook를 많이 사용합니다. 파이썬 코드를 편집하고 실행시킬 수 있으며, 그 결과까지 함께 저장이 됩니다. 그리고 마크다운 문서를 삽입할 수도 있어서 발표자료 작성 및 블로그 기록용으로도 좋습니다. 하지만 딱 하나 걸리는게 있었습니다. 바로 마크다운 렌더링 결과가 너무나도 안이쁩니다. 파이썬 소스코드에 대한 syntax highlighting은 어느 정도 봐줄만 합니다.
이 화면을 렌더링 했더니…

말이 됩니까 ??? 분명 inline code로 처리했는데… 이거 티도 안납니다.

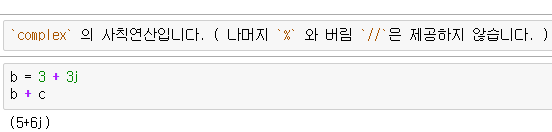
이거 역시 왜 이모양인지…

그래서 찾아봤습니다. css 수정을 통해서 해결이 가능한지
jupyter notebook markdown css 로 구글신님께 여쭤보니 custom.css파일을 특정 위치에 넣어라고 하시는데… 그런 위치가 없습니다.
from IPython.core.display import HTML
def css_styling():
    styles = open("./styles/custom.css", "r").read()
    return HTML(styles)
css_styling()
그냥 css 파일을 만들어서 위 문장을 Jupyter notebook에서 실행하면 된다고 하길래 해봤는데… 진짜로 됩니다. 하지만, 기본적으로 설정된 css에서 해당 내용을 덮어버려서 적용이 되지 않습니다.

Chrome에서 F12를 눌러서 적용된 css를 열어보니깐 죄다 먼저 선언된 .rendered_heml code때문에 아래에 제가 설정한 p code 부분의 내용들이 적용이 안됩니다. 더군다나 기본적으로 설정된 css에서 너무나도 안이뻐서 저걸 건드리지 않고서는 내가 원하는 모양대로 만드는게 힘들어 보입니다. 그래서 결국 그 css파일 자체를 고치기로 마음 먹었습니다. 그럴려면 먼저 css 파일을 찾아야 겠죠 ?

난 벤자민이 아닌데… 위치가 좀 이상하긴 합니다만, 폴더 구조라던지 눈여겨 볼만한게 있어서 저 정보를 기초로 해서 찾아보았습니다. 스크린샷에는 못담았는데, 다른 렌더링된 결과에 대해서 css를 열어보다가 style.min.css 파일을 찾을 수 있었습니다.

C:\Anaconda3\Lib\site-packages\notebook\static\style
그러다 위의 위치에 style.min.css를 찾았습니다. .rendered_html code로 검색해보니 Chrome에서 본것과 똑같은 정의가 나왔습니다.
.rendered_html pre {
  margin: 1em 2em;
}
.rendered_html pre,
.rendered_html code {
  border: 0;
  background-color: #fff;
  color: #000;
  font-size: 100%;
  padding: 0px;
}
이 녀석들을 고쳐봐야 겠습니다. 근데, 어떤 모양으로 고쳐야 이쁠까요 ? 제가 스스로 뭔가 모양을 만드는건 솔직히 믿음이 안가서, 그냥 이쁜 모양의 블로그나 사이트들을 찾아나섰습니다.
요즘 업무때문에 자주 들어가는 ASP.NET Core 사이트 https://docs.asp.net/en/latest/tutorials/first-mvc-app/adding-view.html에 들어가서 F12를 눌러서 css를 까보았습니다.

.rst-content tt.literal, .rst-content tt.literal, .rst-content code.literal {
    color: #E74C3C;
}

.rst-content tt, .rst-content tt, .rst-content code {
    color: #000;
    padding: 2px 5px;
}

code, .rst-content tt, .rst-content code {
    white-space: nowrap;
    max-width: 100%;
    background: #fff;
    border: solid 1px #e1e4e5;
    font-size: 75%;
    padding: 0 5px;
    font-family: Consolas,"Andale Mono WT","Andale Mono","Lucida Console","Lucida Sans Typewriter","DejaVu Sans Mono","Bitstream Vera Sans Mono","Liberation Mono","Nimbus Mono L",Monaco,"Courier New",Courier,monospace;
    color: #E74C3C;
    overflow-x: auto;
}

pre, code, .rst-content tt, .rst-content code, kbd, samp {
    font-family: monospace,serif;
    _font-family: "courier new",monospace;
    font-size: 1em;
}
위 내용들이 필요할듯하여 일단 가져왔습니다.
같은 방식으로 TypeScript 공식 사이트 https://www.typescriptlang.org/docs/tutorial.html에서도 css 내용을 가져왔으며,

.docs-container li code, .docs-container p code, .docs-container td code {
    background-color: transparent;
    color: #bf414a;
    font-size: 1em;
}
Pycon 2016의 Tutorial 신청페이지 https://www.pycon.kr/2016apac/program/tutorial/7에서도 가져왔습니다.

.label-info {
    background-color: #5bc0de;
}

.label {
    display: inline;
    padding: .2em .6em .3em;
    font-size: 75%;
    font-weight: 700;
    line-height: 1;
    color: #fff;
    text-align: center;
    white-space: nowrap;
    vertical-align: baseline;
    border-radius: .25em;
}
* {
    font-family: 'Open Sans', 'Helvetica Neue', 'Apple SD Gothic Neo', 'Nanum Gothic', 'Arial', 'Apple Gothic', sans-serif;
    font-weight: 400;
    line-height: 172%;
    -webkit-font-smoothing: antialiased;
    -webkit-text-size-adjust: 100%;
    -moz-osx-font-smoothing: grayscale;
    text-rendering: geometricPrecision;
    -webkit-transition: background 0.2s;
    -moz-transition: background 0.2s;
    -o-transition: background 0.2s;
    transition: background 0.2s;
}
* {
    -webkit-box-sizing: border-box;
    -moz-box-sizing: border-box;
    box-sizing: border-box;
}
이제 고쳐서 제대로 동작하는지 확인해 보도록 하겠습니다. 먼저 style.min.css 파일 원본을 잘 보관하도록 하겠습니다. style.min.original.css로 복사하였습니다. 그리고 마음에 드는 모양으로 변경하였습니다.
.rendered_html pre,
.rendered_html code {
    white-space: nowrap;
		/* border: 0; */
    background: #fff;
    border: solid 1px #e1e4e5;
		font-family: Consolas,"Andale Mono WT","Andale Mono","Lucida Console","Lucida Sans Typewriter","DejaVu Sans Mono","Bitstream Vera Sans Mono","Liberation Mono","Nimbus Mono L",Monaco,"Courier New",Courier,monospace;
    font-size: 75%;
    padding: 0 5px;
}
p code {
    color: #E74C3C;
    overflow-x: auto;
}
blockquote {
		background-color: #fcf2f2;
		border-color: #dFb5b4;
		border-left: 5px solid #dfb5b4;
		padding: 0.5em;
}
기존의 .rendered_html pre, .rendered_html code를 수정하고 p code와 blockquote를 추가하였습니다.
Jupyter notebook을 종료했다가 다시 재가동해야지만 적용됩니다. 아마 실행시 읽어서 계속해서 적용시키는 듯합니다. 그럼 재 실행해서 화면을 보도록 하겠습니다.


먼가 바뀌기는 했는데, 좀 이상하네요. 선이라든지 글자 크기와 관계된 것은 .rendered_html pre, .rendered_html code에서 한번에 해주는 것보다는 따로따로 적용되도록 고쳐줘야 겠습니다. blockquote는 그대로 두고 위의 2개만 내용을 수정하였습니다.
.rendered_html pre,
.rendered_html code {
	font-family: Consolas,"Andale Mono WT","Andale Mono","Lucida Console","Lucida Sans Typewriter","DejaVu Sans Mono","Bitstream Vera Sans Mono","Liberation Mono","Nimbus Mono L",Monaco,"Courier New",Courier,monospace;

}
p code {
    border: solid 1px #e1e4e5;
    white-space: nowrap;
    background: #fff;
    color: #E74C3C;
    padding: 0 5px;
    overflow-x: auto;
}


이정도만 되어도 기존의 렌더링보다는 훨씬더 마음에 드네요.
앞으로 시간을 두고 조금씩 이쁘게 꾸며봐야 겠습니다.
이 글이 도움이 되셨다면 공감 및 광고 클릭을 부탁드립니다 :)